How to Fix Cloth Diaper Elastics: Easy Step-by-Step Guide
To fix cloth diaper elastics, first remove the old elastic. Then, sew in new elastic along the original path.
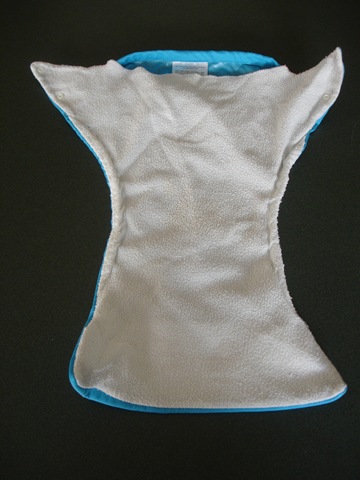
Cloth diaper elastics wear out over time, losing their stretch and effectiveness. Replacing the elastic can extend the life of your diapers and save money. This task is simple and can be done with basic sewing skills. You’ll need a seam ripper, new elastic, and a sewing machine.
Carefully follow the steps to ensure the new elastic is securely in place. Properly maintained cloth diapers offer better comfort and leak protection for your baby. Regularly checking and updating the elastic ensures your cloth diapers remain functional and efficient.

Credit: www.mamaslaundrytalk.com
Gathering Supplies
Fixing cloth diaper elastics is a handy skill for parents. Start by gathering the right supplies. This makes the process easier and faster. Below are the supplies you need.
Essential Tools
First, gather some basic tools. These tools will help you repair the diaper elastics efficiently.
- Scissors: For cutting the old elastic and new materials.
- Seam Ripper: To remove stitches without damaging the fabric.
- Safety Pins: To hold the fabric in place while you work.
- Needle and Thread: For sewing the new elastic in place.
- Measuring Tape: To measure the length of the replacement elastic.
Choosing Replacement Elastics
Next, select the right replacement elastics. The elastic type and length are crucial for a good fit.
- Elastic Type: Choose soft, stretchy elastic for comfort.
- Elastic Length: Measure the old elastic and cut the new one slightly shorter.
- Elastic Width: Ensure it matches the original width to fit the diaper casing.
Here is a quick reference table:
| Supply | Purpose |
|---|---|
| Scissors | Cutting |
| Seam Ripper | Removing Stitches |
| Safety Pins | Holding Fabric |
| Needle and Thread | Sewing Elastic |
| Measuring Tape | Measuring Elastic |
| Replacement Elastic | New Elastic for Diaper |
With these supplies, you are ready to fix your cloth diaper elastics.
Preparation
Fixing cloth diaper elastics can extend their life. Proper preparation ensures a smoother repair process. Here are key steps to prepare for fixing cloth diaper elastics.
Cleaning The Diaper
Before starting, clean the diaper thoroughly. This ensures a hygienic repair process. Follow these steps:
- Remove any solids and rinse the diaper.
- Use a gentle detergent suitable for baby clothes.
- Wash in warm water to remove all residues.
- Rinse thoroughly to ensure no soap remains.
- Dry the diaper completely before proceeding.
Finding The Problem Area
Identifying the exact problem area is crucial. Follow these steps to locate the worn-out elastic:
- Lay the diaper flat on a clean surface.
- Gently stretch the elastic areas.
- Check the leg openings and waistbands for slackness.
- Look for visible signs of wear or tear.
- Mark the areas needing repair with a fabric pen.
| Step | Action |
|---|---|
| 1 | Clean the diaper thoroughly. |
| 2 | Remove solids and rinse. |
| 3 | Use gentle detergent and wash. |
| 4 | Rinse thoroughly. |
| 5 | Dry the diaper completely. |
| 6 | Lay diaper flat and stretch elastics. |
| 7 | Check leg openings and waistbands. |
| 8 | Look for wear or tear. |
| 9 | Mark areas needing repair. |
Removing Old Elastics
Fixing cloth diaper elastics can seem like a daunting task. But, removing the old elastics is the first step. This process is crucial for ensuring the new elastics work properly. Follow these steps to make the task easier and more efficient.
Careful Seam Ripping
Start by using a seam ripper to open the seams. Be gentle to avoid damaging the fabric. You need to access the old elastics without tearing the diaper.
Place the seam ripper at the beginning of the seam. Slide it carefully to cut the stitches. Take your time to ensure the fabric stays intact.
Once you’ve opened the seam, you’ll see the old elastics. Proceed to the next step to remove them completely.
Extracting Worn Elastics
Now, you need to pull out the old elastics. Hold the end of the elastic with tweezers or your fingers. Gently pull it out of the fabric casing.
If the elastic is sewn in, use small scissors to cut the threads. Be careful to only cut the threads holding the elastic.
Keep pulling the elastic until it is completely removed. Discard the worn elastics properly. Your diaper is now ready for new elastics.
| Step | Action |
|---|---|
| 1 | Use seam ripper to open seams. |
| 2 | Locate the old elastics. |
| 3 | Pull out the old elastics. |
| 4 | Cut threads if necessary. |
| 5 | Discard old elastics. |
Measuring And Cutting New Elastics
Fixing cloth diaper elastics can be easy. Measuring and cutting new elastics is a key step. This ensures the diaper fits well and stays snug. Let’s dive into the details of measuring and cutting elastics.
Measuring Correct Length
Accurate measurement is crucial. First, gather your tools: a soft measuring tape, a marker, and the old elastic. Lay the diaper flat on a table. Measure the length of the old elastic.
If the old elastic is stretched out, measure the length of a similar, unstretched elastic. Use this measurement for the new elastic. Write down the length to avoid mistakes.
Here’s a simple table to keep track of measurements:
| Diaper Size | Elastic Length |
|---|---|
| Small | 4 inches |
| Medium | 5 inches |
| Large | 6 inches |
Cutting Elastics Accurately
Cutting the elastic accurately ensures a good fit. Use sharp scissors to avoid fraying. Measure the new elastic twice before cutting. Mark the cutting point with a marker.
Follow these steps to cut the elastic:
- Lay the elastic flat.
- Mark the measured length.
- Use sharp scissors.
- Cut along the marked point.
Cutting accurately saves time and ensures the elastic fits well.
Attaching New Elastics
Fixing the elastics on your cloth diapers can extend their life. Attaching new elastics is a key step in this process. This guide will help you replace worn-out elastics easily.
Pinning New Elastics
To start, gather your materials. You’ll need a seam ripper, new elastics, and pins. First, remove the old elastics using the seam ripper. Be gentle to avoid damaging the fabric.
Next, cut the new elastics to the right length. The length should match the old ones. Use pins to hold the new elastics in place. Ensure the elastics are stretched evenly.
| Steps | Description |
|---|---|
| 1 | Gather materials: seam ripper, elastics, pins |
| 2 | Remove old elastics gently |
| 3 | Cut new elastics to match old length |
| 4 | Pin new elastics in place |
Sewing Them Securely
Now, it’s time to sew the elastics. Use a zigzag stitch for better hold. Start sewing one end of the elastic. Stretch it as you sew to keep it taut.
Make sure to backstitch at the beginning and end. This ensures the elastic stays secure. Check your work to confirm the elastic is firmly attached.
- Use a zigzag stitch
- Stretch the elastic while sewing
- Backstitch at both ends
- Check for firmness

Credit: dirtydiaperlaundry.com
Final Steps
You’ve reached the final steps of fixing your cloth diaper elastics. This part ensures your diaper is ready for use again. Follow the steps below to complete your repair.
Reassembling The Diaper
Start by placing the new elastic in the same spot as the old one. Use safety pins to hold the elastic in place. Sew the ends securely to the diaper fabric. Ensure the stitches are tight and secure.
Next, thread the elastic through the casing. Use a safety pin attached to one end to help guide it through. Once the elastic is in place, sew the open ends of the casing shut. Make sure no elastic is sticking out.
After securing the elastic, reattach any parts you removed earlier. This includes snaps, Velcro, or buttons. Ensure everything is back in its original spot and secure.
Inspecting Your Work
Now, it’s time to inspect your work. Check the elasticity by stretching the diaper gently. Make sure the elastic returns to its original shape without any issues.
Look at the stitches to ensure they are strong and even. No loose threads should be visible. If you see any, trim them carefully.
| Inspection Task | What to Look For |
|---|---|
| Elastic Stretch | Returns to shape smoothly |
| Stitches | Strong and even |
| Loose Threads | None visible |
Lastly, test the diaper on your baby. Check for comfort and fit. Ensure there are no gaps or tight spots.
By following these steps, your cloth diaper should be as good as new. Happy diapering!
Maintenance Tips
Maintaining cloth diaper elastics can extend their life and performance. Here are some essential maintenance tips to keep your cloth diapers in top shape.
Preventing Future Issues
- Rinse immediately: Rinse diapers right after use. This prevents residue build-up.
- Avoid heat: High heat can damage elastics. Use low heat settings.
- Use gentle detergents: Harsh chemicals degrade elastics. Choose mild, eco-friendly detergents.
- Check regularly: Inspect elastics for signs of wear. Early detection helps prevent bigger problems.
Extending Diaper Life
To extend the life of your cloth diaper elastics, follow these steps:
- Rotate your stash: Use a variety of diapers. This reduces wear on any one diaper.
- Store properly: Store clean, dry diapers in a cool, dry place.
- Handle with care: Avoid stretching elastics unnecessarily. Handle them gently.
| Action | Benefit |
|---|---|
| Rinse immediately | Prevents residue build-up |
| Avoid heat | Prevents elastic damage |
| Use gentle detergents | Protects elastic integrity |
| Check regularly | Early detection of wear |

Credit: www.youtube.com
Frequently Asked Questions
How Do You Fix Worn-out Cloth Diaper Elastics?
To fix worn-out elastics, you’ll need to replace them. Remove the old elastic, cut new elastic to size, and sew it in place. This will restore the snug fit and functionality of your cloth diaper.
What Tools Are Needed To Replace Elastic?
You’ll need a seam ripper, new elastic, a sewing needle, and thread. A sewing machine can speed up the process but isn’t necessary. These tools will help you remove the old elastic and securely attach the new one.
Can You Hand Sew New Elastic In Cloth Diapers?
Yes, you can hand sew new elastic into cloth diapers. Use a needle and strong thread to attach the new elastic securely. Ensure each stitch is tight to maintain the diaper’s functionality.
How Often Should You Replace Diaper Elastics?
Typically, replace diaper elastics every 1-2 years. This depends on usage and washing frequency. Regularly check the elastics for signs of wear to ensure a good fit.
Conclusion
Reviving your cloth diapers with fixed elastics is simple. Follow these steps for a snug, leak-free fit. Regular maintenance extends their life and keeps your baby comfortable. Enjoy the benefits of reusable diapers and save money in the long run.
Happy diapering!


