How to Put on a Diaper Correctly: Expert Tips for Parents
To put on a diaper correctly, first, lay the baby on a flat surface. Then, position the diaper under the baby and secure the tabs.
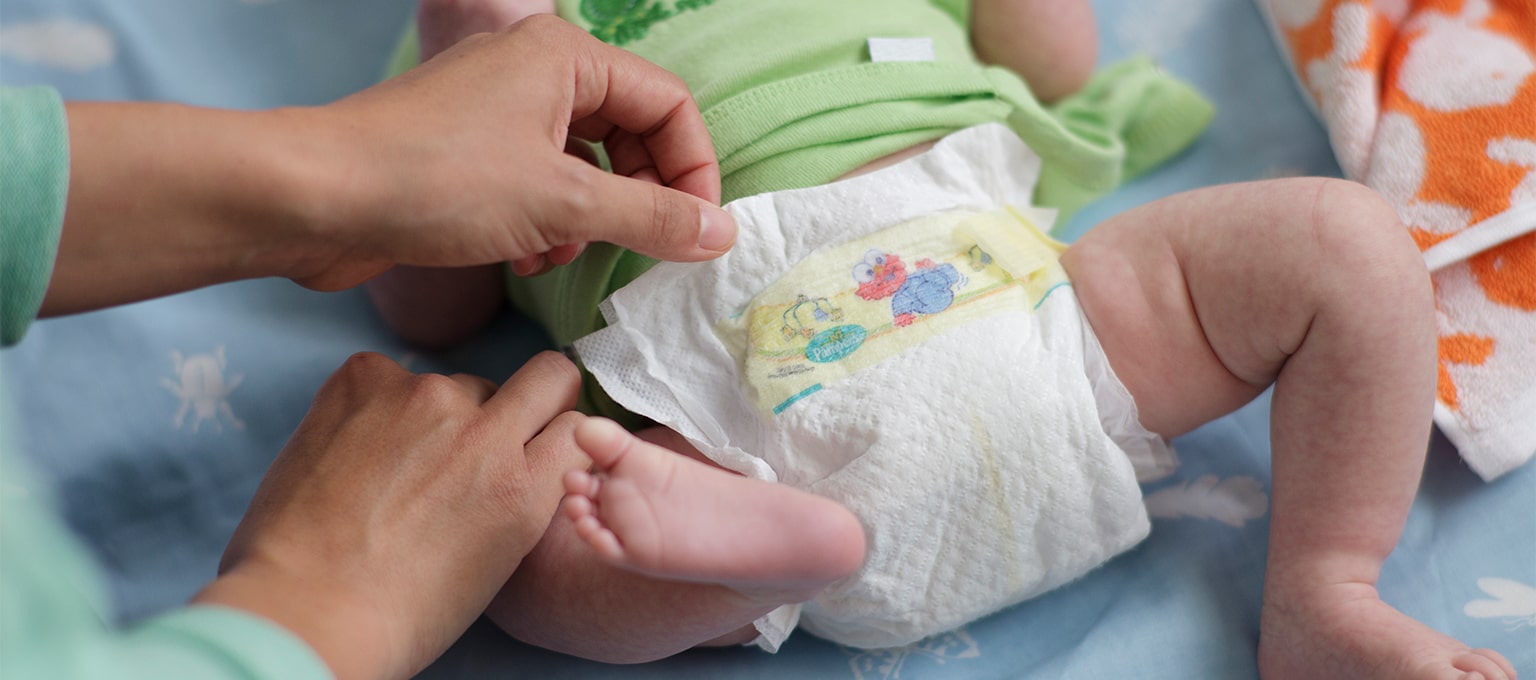
Diapering a baby might seem daunting at first, but with a few simple steps, you can master it quickly. Ensure you have all necessary supplies like a clean diaper, wipes, and cream within reach. Lay your baby on a safe, flat surface and gently lift their legs to slide the diaper underneath.
Align the diaper properly, ensuring the back side is higher than the front. Fasten the adhesive tabs snugly, but not too tight, around your baby’s waist. Check for any gaps around the legs to prevent leaks. With practice, diaper changes will become a smooth and swift routine.
Choosing The Right Diaper
Choosing the right diaper is crucial for your baby’s comfort and health. There are various options available, and making the right choice can be daunting. This section will guide you through the main considerations to help you make an informed decision.
Cloth Vs. Disposable
There are two primary types of diapers: cloth and disposable. Each has its own advantages and disadvantages.
| Type | Pros | Cons |
|---|---|---|
| Cloth |
|
|
| Disposable |
|
|
Finding The Right Size
Finding the right size diaper is essential for your baby’s comfort. Diapers that are too tight can cause rashes. Diapers that are too loose can lead to leaks.
To find the correct size, consider these factors:
- Weight: Diaper sizes are usually based on your baby’s weight.
- Age: Although weight is more accurate, age can be a useful guide.
- Fit: Ensure there are no gaps around the legs and waist.
Here is a general guide for diaper sizes:
| Size | Weight Range |
|---|---|
| Newborn | Up to 10 lbs |
| Size 1 | 8-14 lbs |
| Size 2 | 12-18 lbs |
| Size 3 | 16-28 lbs |
| Size 4 | 22-37 lbs |
| Size 5 | 27+ lbs |
Credit: www.pampers.com
Preparation Steps
Proper preparation ensures a smooth diaper-changing process. Follow these steps to prepare for a diaper change.
Gathering Supplies
Start by gathering all necessary supplies. You will need:
- Clean Diaper
- Baby Wipes
- Diaper Rash Cream (if needed)
- Changing Mat or Pad
- Hand Sanitizer (for your hands)
- Plastic Bag (for the dirty diaper)
Setting Up The Changing Area
Choose a safe and clean surface. A changing table is ideal. If not, use a bed or floor with a changing mat.
Lay out the changing mat or pad. Place all supplies within arm’s reach. Ensure good lighting for visibility.
For safety, never leave your baby unattended. Always keep one hand on your baby during the change.
Safety And Hygiene
Proper safety and hygiene are essential when putting on a diaper. Keeping your baby safe and clean prevents infections. Follow these steps to ensure your baby stays healthy.
Sanitizing Your Hands
Always sanitize your hands before touching your baby. This step removes germs that can cause infections.
Use soap and water for at least 20 seconds. If soap is unavailable, use hand sanitizer with at least 60% alcohol. Dry your hands with a clean towel.
Using A Changing Pad
A changing pad keeps your baby safe and the surface clean. Place the pad on a stable surface to prevent falls.
Ensure the pad is clean before each use. Wipe it down with disinfecting wipes. Use a disposable cover for extra cleanliness.
Here is a simple checklist to follow:
- Sanitize hands
- Use a clean changing pad
- Wipe down the pad
- Use a disposable cover
Following these steps ensures your baby’s safety and hygiene during diaper changes.

Credit: www.youtube.com
Laying Your Baby Down
Putting on a diaper correctly starts with laying your baby down properly. A safe and comfortable position helps the process go smoothly. Let’s explore the steps to ensure your baby is comfortable and secure.
Finding A Safe Position
Before you start, make sure you have a clean, flat surface. A changing table with safety straps is ideal. If you don’t have a changing table, a soft blanket on the floor works too.
- Place your baby gently on their back.
- Ensure their head is slightly elevated.
- Keep all diapering supplies within reach.
| Surface | Benefits |
|---|---|
| Changing Table | Safe, elevated, and has storage for supplies. |
| Floor with Blanket | Safe, spacious, and easy to clean. |
Distracting Your Baby
Babies can get fussy during diaper changes. Distractions help keep them calm.
- Use a favorite toy or rattle.
- Sing a soothing song.
- Talk to them in a gentle voice.
Distracting your baby makes the diaper change easier. It also helps create a pleasant experience for both of you.
Removing The Soiled Diaper
Properly removing a soiled diaper is crucial for your baby’s hygiene. Follow these steps to ensure a clean and comfortable diaper change.
Unfastening The Tabs
First, lay your baby on a clean, flat surface. Gently unfasten the diaper tabs, located on either side of the diaper. Be careful not to pull too quickly. This may startle your baby.
Next, fold the front of the diaper down. Use the diaper itself to wipe away any excess mess. This helps keep the area cleaner before you begin wiping.
Cleaning The Area
Use baby wipes or a damp cloth to clean the diaper area. Always wipe from front to back. This prevents infections, especially in baby girls.
Ensure all folds and creases are clean. This helps avoid rashes and irritation. Pat the area dry with a soft towel. Moisture can cause diaper rash.
| Step | Action |
|---|---|
| 1 | Unfasten the diaper tabs. |
| 2 | Fold the diaper front down. |
| 3 | Wipe away excess mess. |
| 4 | Clean the area with wipes. |
| 5 | Pat the area dry. |
Follow these steps to remove a soiled diaper correctly. This ensures your baby stays healthy and comfortable.
Placing The New Diaper
Putting on a diaper correctly can be easy. Follow these steps to ensure a snug fit and prevent leaks. In this section, we will cover the basics of positioning and securing the diaper.
Positioning The Diaper
First, lay your baby on a clean, flat surface. Ensure the baby is comfortable. Open the new diaper and identify the front and back. The back usually has tabs or adhesive strips.
Slide the new diaper under your baby. Ensure the back edge aligns with the baby’s waist. The diaper should cover the baby’s bottom completely.
Bring the front part of the diaper up between the baby’s legs. Ensure it is centered and covers the baby’s belly button.
Securing The Tabs
Next, gently pull the adhesive tabs from the back of the diaper. Bring them around to the front. Attach the tabs to the front of the diaper securely.
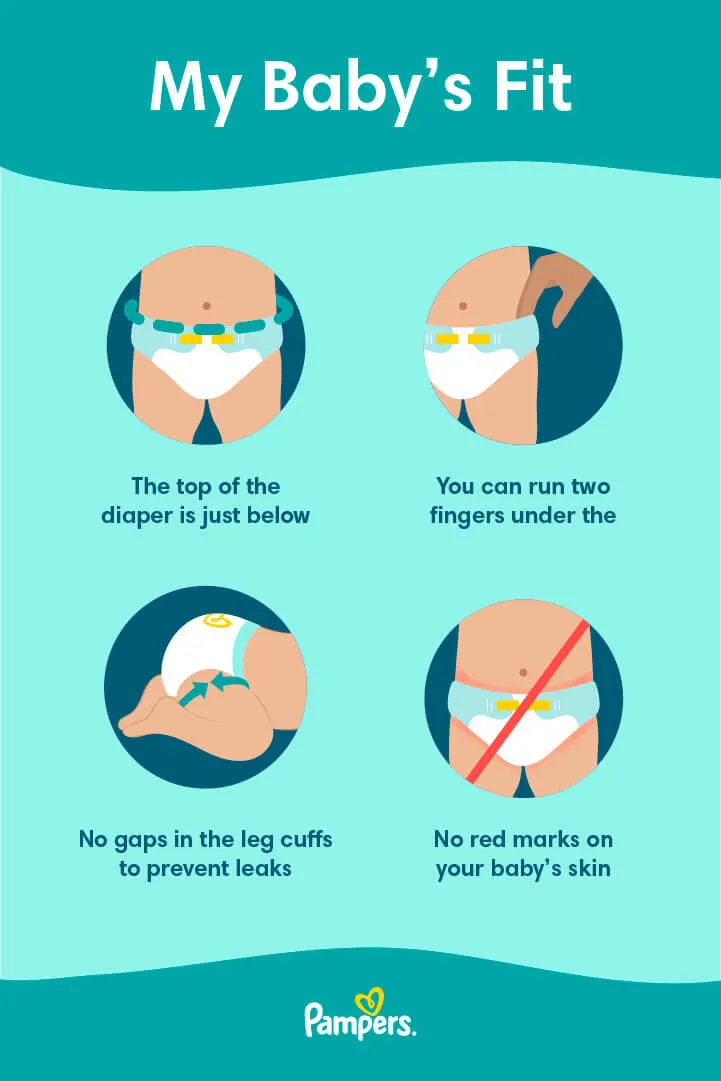
Make sure the diaper is snug but not too tight. You should be able to fit two fingers between the diaper and the baby’s waist.
Check the leg cuffs to ensure they are not tucked in. This helps prevent leaks.
| Step | Action |
|---|---|
| 1 | Lay baby on flat surface |
| 2 | Open new diaper |
| 3 | Slide diaper under baby |
| 4 | Position diaper correctly |
| 5 | Secure the tabs |
| 6 | Check for snug fit |
Preventing Leaks And Rashes
Ensuring a diaper is put on correctly can prevent leaks and rashes. A snug fit and proper use of diaper cream are key. This keeps your baby comfortable and dry.
Adjusting For A Snug Fit
A snug fit around the waist and legs is crucial. Follow these steps for a secure fit:
- Place the diaper under the baby.
- Pull the front part up to the baby’s belly button.
- Wrap the side tabs around the waist.
- Fasten the tabs snugly but not too tight.
Ensure the diaper is not too loose or too tight. A loose diaper can cause leaks. A tight diaper can cause rashes and discomfort.
Check the fit by sliding a finger between the diaper and the baby’s waist. If it fits comfortably, the diaper is snug enough.
Using Diaper Cream
Diaper cream protects your baby’s skin from rashes. Apply it during every diaper change:
- Clean the baby’s bottom with a wet wipe.
- Pat the area dry with a soft cloth.
- Squeeze a small amount of diaper cream onto your fingers.
- Gently spread the cream over the diaper area.
Cover all areas where the diaper touches the skin. This creates a barrier against moisture and prevents rashes.
Choose a diaper cream with zinc oxide for best results. This ingredient is effective in protecting the skin.
Following these steps helps keep your baby dry and comfortable. This reduces the chances of leaks and rashes.
Disposing Of The Diaper
Properly disposing of a used diaper is essential. It helps maintain hygiene and keeps unpleasant odors at bay. Follow these steps to ensure you dispose of the diaper correctly.
Sealing The Diaper
Before throwing the diaper away, it is crucial to seal it properly. This minimizes mess and traps odors. Follow these steps:
- Roll the diaper tightly from front to back.
- Use the adhesive tabs to keep it rolled.
- Ensure all waste is enclosed within the roll.
Sealing the diaper correctly also helps prevent leaks. This keeps your trash bin clean and odor-free.
Choosing A Disposal Method
There are several ways to dispose of a used diaper. Choose one that suits your needs:
| Disposal Method | Pros | Cons |
|---|---|---|
| Diaper Pail | Keeps odors contained | Needs regular emptying |
| Regular Trash Bin | Easy and convenient | May spread odors |
| Biodegradable Bags | Environmentally friendly | Can be costly |
Choose a method based on your preference and convenience. Always make sure to wash your hands after disposing of the diaper.
Common Mistakes To Avoid
Putting on a diaper might seem simple, but many parents make mistakes. These errors can cause discomfort and leaks. Avoiding common mistakes ensures your baby stays happy and dry.
Incorrect Sizing
Using the wrong diaper size is a common error. Diapers that are too small or too big can cause leaks and rashes.
| Signs of Incorrect Sizing | Solution |
|---|---|
| Frequent leaks | Check the weight range on the diaper package. |
| Red marks on the baby’s skin | Move to a bigger size if marks appear. |
| Diaper gaps at the legs | Choose a smaller size for better fit. |
Ignoring Red Marks
Red marks are a sign of discomfort. Always check for red marks after changing the diaper.
- Check waist and leg areas for any signs of irritation.
- Adjust diaper tightness if red marks appear. It might be too tight.
- Switch diaper sizes if marks persist after adjustments.
Paying attention to these marks helps keep your baby comfortable.
When To Seek Help
While putting on a diaper is usually straightforward, sometimes issues arise. Knowing when to seek help can make a big difference. This section covers two main problems: persistent rashes and chronic leaks. Understanding these issues helps you address them effectively.
Persistent Rashes
Diaper rashes are common but can become problematic if they persist. Here are some signs you need to seek help:
- The rash lasts more than three days.
- The rash seems to be getting worse.
- Your baby seems very uncomfortable or in pain.
- The rash is accompanied by fever.
If you notice any of these signs, consult your pediatrician. They can provide specific treatments or identify underlying issues. Proper hygiene and using the right diaper can also help prevent rashes.
| Sign | Action |
|---|---|
| Rash lasts more than 3 days | Consult pediatrician |
| Rash getting worse | Seek medical advice |
| Baby seems uncomfortable | Visit doctor |
| Rash with fever | Immediate medical attention |
Chronic Leaks
Chronic leaks can be frustrating and messy. Here’s what to look for:
- Frequent diaper leaks despite regular changing.
- Leaks that occur during both day and night.
- Wet clothes or bedding even with a snug diaper fit.
If you encounter these issues, try these steps:
- Ensure the diaper size is correct.
- Check if the diaper is properly fastened.
- Consider switching to a different brand or type.
If leaks persist, consult your healthcare provider. They can offer advice tailored to your baby’s needs. Consistent leaking might indicate a need for a different diapering strategy.
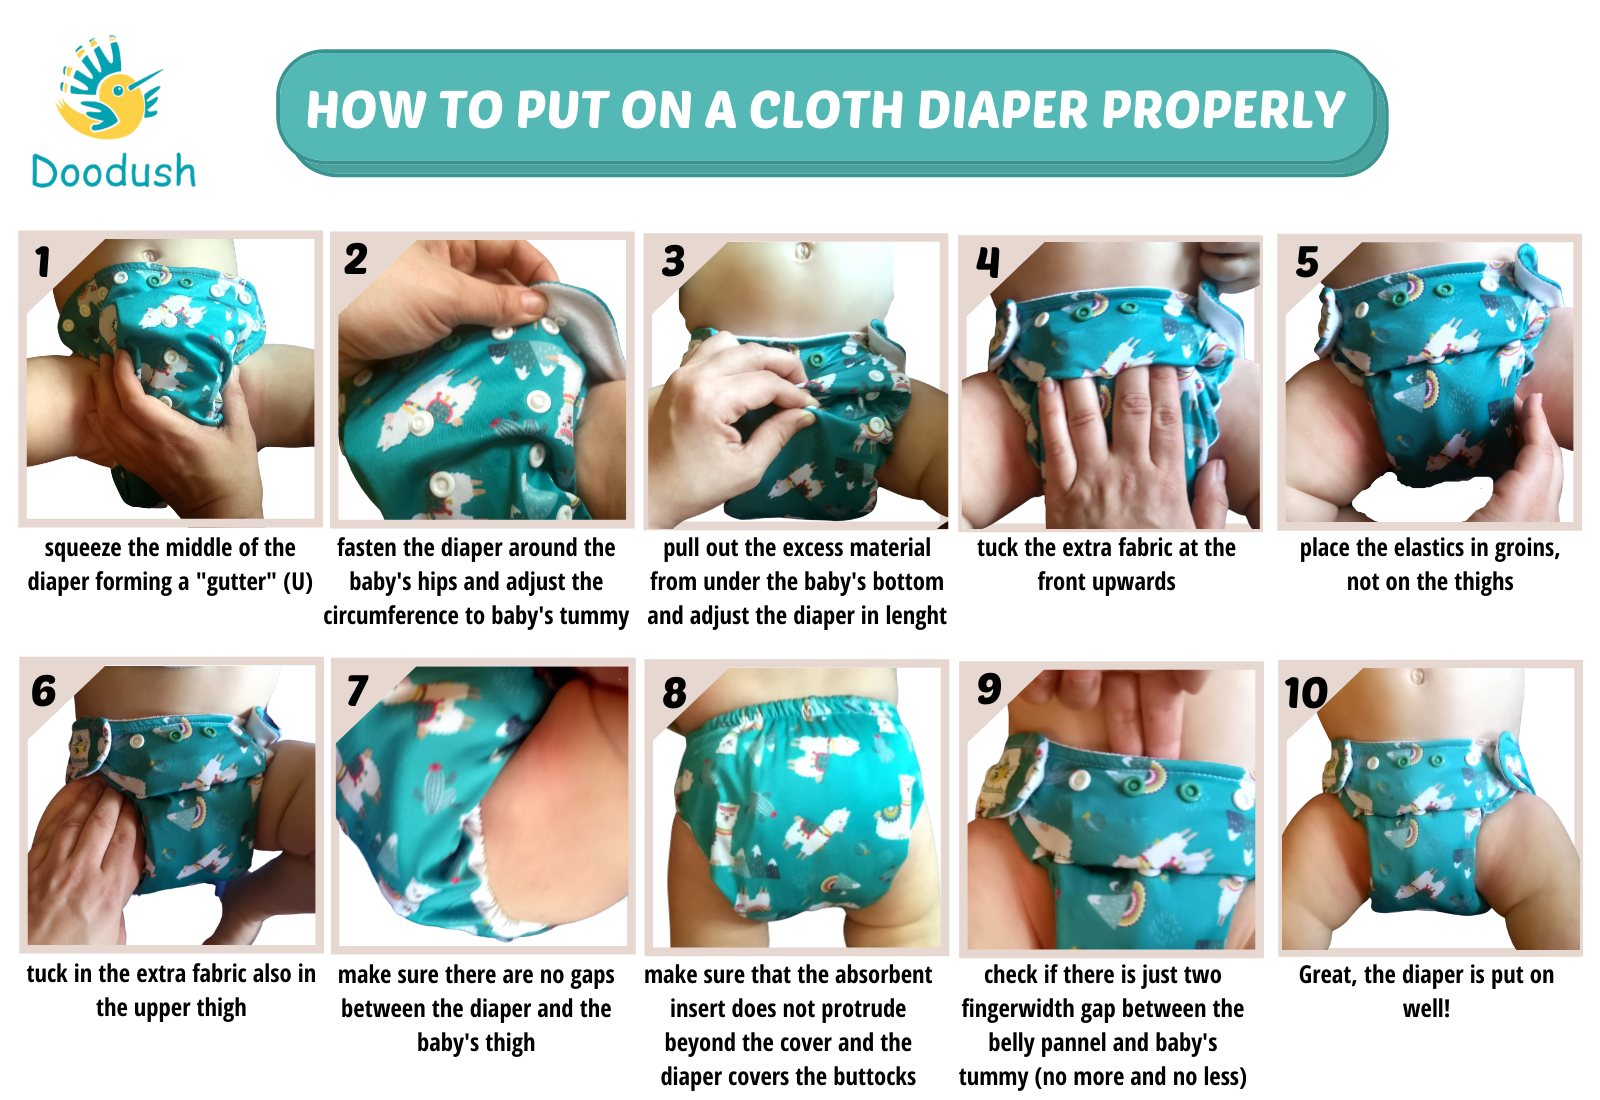
Credit: doodush.com
Frequently Asked Questions
How Do You Put On A Diaper Correctly?
To put on a diaper correctly, lay the baby on their back. Place the diaper under them, pull the front up, and fasten the tabs snugly but comfortably.
What Are The Steps To Change A Diaper?
First, gather all supplies. Lay the baby down, remove the dirty diaper, clean the area, and put on a fresh diaper.
How Tight Should A Diaper Be?
A diaper should be snug but not too tight. You should be able to fit two fingers between the diaper and the baby’s waist.
How Often Should You Change A Diaper?
Change a diaper every 2-3 hours or as soon as it becomes soiled to prevent diaper rash and discomfort.
Conclusion
Mastering the art of diapering ensures your baby stays comfortable and happy. Follow these steps to secure a snug fit. Proper diapering keeps your baby dry and prevents rashes. Practice makes perfect, so don’t worry if it takes a few tries.
Your confidence will grow with each change. Happy diapering!